New format in GIMP: HGT

Lately a recurrent contributor to the GIMP project (Massimo Valentini) contributed a patch to support HGT files. From this initial commit, since I found this data quite cool, I improved the support a bit (auto-detection of the variants and special-casing in particular, as well as making an API for scripts).

So what is HGT? That’s topography data basically just containing elevation in meters of various landscape (HGT stands for “height“), gathered by the Shuttle Radar Topography Mission (SRTM) run by various space agencies (NASA, National Geospatial-Intelligence Agency, German and Italian space agencies…). To know more, you can read here and there.
HGT download source: https://dds.cr.usgs.gov/srtm/version2_1/
(go inside SRTM1/ and SRTM3/ directories for respectively 1 arc-second and 3 arc-seconds sampled data)
You probably won’t find other links of interest since not everyone can do such data (not everyone has satellites!).

Here is what it can look like after processing: left is an image obtained from NASA PDF, and right is the same data imported in GIMP followed by a gradient mapping.

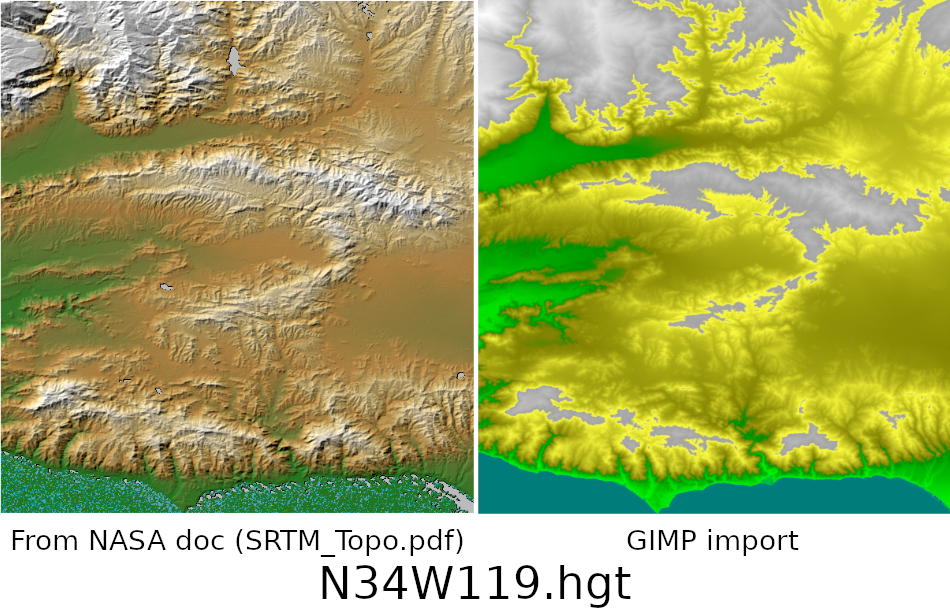
So the support is not perfect yet because to get a nice looking result, you need to do it in several steps and that involves likely a bunch of tweaking. My output above is not that good (colors look a bit radioactive compared to the NASA one!) but that’s mostly because I didn’t take the time to tweak more.

And so that’s why I am writing this blog post. Someone trying to import HGT files in GIMP may be a bit disconcerted at first (so I’m hoping you’ll find this blog post to go further). At first you’d likely get a nearly uniform-looking grey image and may think that HGT import is broken. It is not.

What’s happening? Why is the imported HGT all uniform grey?

GIMP by default will convert the HGT data into greyscale. That is not a problem by itself since we can have very well contrasted greys. But that doesn’t happen for HGT import. Why?

HGT contains elevation data as signed 16-bit integers representing meters. In other words, it represents elevation from -32767 m to 32767 m (with an exception for -32768 which means “void”, i.e. invalid data; since that’s raw data with minimum processing, it can indeed contain errors). Therefore once mapped to [0; 1] range, color 0 (pure black) is invalid, ]0; 0.5] is anything under water level and [0.5; 1] is above water elevation.

Considering that on earth, the highest point is Mount Everest at 8848m, when mapped to our [0; 1] range, we see it has value 0.635. So you can see the problem: most things on earth will be represented with greys really close to 0.5 and that’s why there is no contrast.

How to get nice colors and contrast?

There are several solutions, but the one proposed by the contributor was to use the “Gradient Map” plug-in. That’s a good idea. Basically you remap your greys from 0 to 1 into color gradients.
Now you can try to create a gradient by setting random stops through the GUI, but that will most likely be quite a challenge. A better idea is to do it a bit more “scientifically” (i.e. to use numbers, which you can also do through the GUI by using the new blend tool, though not as accurately as I’d like with only 2 decimal places). This is what did Massimo here by creating a gradient file which would map “magenta for invalid data, blue below zero, green to 1000 m, yellow to 2000m, and gray to white above“. From this base, I added a bit of random tweaking because I was trying to get an output similar to the NASA document (just for the sake of it), so you can get a look at how my own gradient file looks like. But if you are looking to, say, create a relief map with accurate elevation/color mapping, you’d prefer to stick by the number-only approach.

Then once you get your gradient “code”, copy it in a file with the extension .ggr inside the gradients/ folder of your GIMP config, and just use it when running “Gradient Map” filter.

Just to explain a bit the format: for each line, you get the startpoint, midpoint and endpoint coordinates (in the [0; 1] range), followed by 4 values for RGBA (also in [0; 1] range) for the startpoint then again 4 values for RGBA endpoint color. Then you get an integer for the blending mode (you likely want to keep it linear, i.e. 0, for a relief map), then the coloring value (leave it to 0 as well, which is RGB). Finally the last 2 integers are whether the startpoint and endpoint must be fixed colors, or correspond to foreground, background, etc. You will likely want to keep them as fixed colors (0).

So basically a line like this:

0.500000 0.507633 0.515267 0.000000 1.000000 0.000000 1.000000 0.000000 0.500000 0.000000 1.000000 0 0 0 0

means: gradient from 0 meter (0.5) to 1000 m ((0.515267 – 0.5) × 216 ≈ 1000) is a linear gradient from RGBA 0-1-0-1 (green) to RGBA 0-0.5-0-1. That is:

start mid end Rs Gs Bs As Re Ge Be Ae 0 0 0 0

where start is the start elevation and end the end elevation in [0; 1] range; and RsGsBsAs and ReGeBeAe are respectively the start and end gradient colors.

That’s how you can easily map the elevation into colors! I hope that’s clear! 🙂

Can’t we have nicer support with a GUI?

Yes of course. This was fun and cool to review then improve this feature, and we should not let quality patches rot in our bugtracker, but that’s not my priority (as you know) so I stopped improving the feature (if I don’t stop myself from all these funny stuff out there, when would I work on ZeMarmot?!).
I gladfully accept new patches to improve the support and have left myself 2 bug reports to leave ideas about how to improve the current tools:

  • Improve “Gradient Map” filter to provide on-canvas preview and editing, similarly to the blend tool, because I realize this filter is powerful but that is a bit of a pain to use right now (iterations of edit gradient, run the filter for test, cancel, again and again).
  • Map gradients directly from HGT import with preview and [0; 1] range remapped to elevation in meters in the dialog so that we don’t have to constantly recompute values back and forth and edit .ggr files by hand.

In the meantime, I leave this blog post so that the format is at least understandable and HGT import usable to moderately technical people. 🙂

That’s it! Hopefully this post will be useful to someone needing to process HGT files with GIMP and willing to understand how this works, until we get more intuitive support.

Reminder: my Free Software coding can be funded on
Liberapay, Patreon or Tipeee through ZeMarmot project.

GIMP 2.9.6 & ZeMarmot

Note: this is a copy of a post initially posted on Patreon and Tipeee.

Splash of GIMP 2.9.6 by Aryeom

Last month, we released the third development version of GIMP, version 2.9.6, as preparation of the next stable version, GIMP 2.10.

Same as for previous versions, ZeMarmot project was one of the major contributors with 274 commits (out of 1885 total for this release) by Jehan, 4 by Aryeom (some icons, a new paint dynamics “Pressure Size” very useful for flat coloring, and the splash image for this development version), and even for the first time, 3 commits by Lionel, a board member of LILA association. Hence about 15% of GIMP 2.9.6 was brought to you by ZeMarmot! 🙂

To get some more insight, you can have a look at the official announcement. And if you want to get the full and accurate list of Jehan’s contributions in particular, it is available on the source repository.

Brought to you in 2.9.6 by ZeMarmot

  • made libgimp as thread-safe, which basically means simplify plug-in developer work to have plug-ins using  several cores (now all desktop computers are multi-core);
  • display angles when drawing lines;
  • code review for WebP image support, as well as some improvements and fixes (and even a patch upstream on libwebp library);
  • capability to switch exclusive visibility of layers inside layer groups only with shift-click (feature requested and tested/used by Aryeom for a few months before adding it to GIMP);
  • contributing to the Darktable and RawTherapee  developers efforts for our new “raw” plug-in allowing importing  RAW files through these third-party software and into GIMP (GIMP project advocates for cooperation with other Free Software);
  • contribution to allow GIMP to follow GEGL multi-thread limit (once again to have a better usage of modern computer processors but now in GIMP core in particular);
  • various improvements of PDF support, in particular multi-page PDF export from layers (this is the part where Lionel from LILA made his first steps as a developer with Jehan’s help!);
  • code review and fixes for improved support of PCX images import and export;
  • capacity of plug-ins to be installed in their own subdirectory,  which should in the long run allow to get rid of the “DLL hell”, in  particular on Windows system, a very common issue where some plug-ins  embed libraries breaking other plug-ins;
  • change various defaults values to get to up-to-date standards (bigger default font size, fullHD as the new default image dimension, 300 PPI default resolution instead of 72…);
  • intelligent adaptation of physical dimension precision based on printing resolution to allow better precision in various parts of the  software (measure tool, status bar, etc.);
  • capacity to choose the icon size, allowing to adapt GIMP on smaller or bigger screen and in particular high density screens, etc.;
  • auto-detection of native resolution of your screen to choose  better default icon size (this default choice can still be changed, cf.  previous point; but at least you should get better defaults);
  • vector icons by default for the various size support;
  • welcome new code contributors by adding a vim coding style file and integrating contributed emacs and kate coding style files;
  • Flatpak package for GIMP;
  • and much more! Bug fixes and minor features by the dozens!

Flatpak for creators on Linux?

For the creators who use GIMP on a GNU/Linux operating system, you may have heard of Flatpak,  the generic application package system. Since we also exclusively use  Linux, it felt important that GIMP be available in a timely manner (with  distribution package systems, it is not unheard of to have to wait  months after actual release to get some new version!). We take the opportunity of the release of 2.9.6 to test a first public Flatpak package. Since  we don’t have a stable server, we made it available to our Patreon  and Tipeee contributors only for the time being, then will try and make it available for everyone very  soon!

For information, Windows already has a GIMP  2.9.6 installer available; and a MacOS package should hopefully soon get  uploaded (it will depends on this package maintainer who has some family priorities right now). These are not maintained by us. » See the download page! « 🙂

Thanks and “en route to GIMP 2.10”!

I hope you appreciate our contributions to GIMP! Know that these are all thanks to our contributors, be them Patreon or Tipeee, in previous crowdfundings or the ones who make direct donations.

It is not easy everyday because we seriously lack funding, and we have had some blues more than once. ;-(
Yet the many of you who never failed us and continue to support us give us some courage.
Thanks to you!

We will continue in order to bring you an awesome stable GIMP 2.10. 🙂

Have fun with GIMP!

GIMP Motion: part 2 — complex animations

This is the second video to present GIMP Motion, our plug-in to create animations of professional quality in GIMP. As previously written, the code is pretty much work-in-progress, has its share of bugs and issues, and I am regularly reviewing some of the concepts as we experiment them on ZeMarmot. You are still welcome to play with the code, available on GIMP official source code repository under the same Free Software license (GPL v3 and over). Hopefully it will be at some point, not too far away, released with GIMP itself when I will deem it stable and good enough. The more funding (see in the end of the article for our crowdfunding links) we get, the faster it will happen.

Whereas the previous video was introducing “simple animations”, which are mostly animations where each layer is used as a different finale frame, this second video shows you how the plug-in handles animations where every frame can be composited from any number of layers. For instance a single layer for the background used throughout the whole animation, and separate layers for a character, other layers for a second character, and layers for other effects or objects (for instance the snow tracks in the example in the end of the video).

It also shows how we can “play” with the camera, for instance with a full cut larger than the scene where you “pan” while following the characters. In the end, we should be able to animate any effect (GEGL operations) as well. This could be to blur the background or foreground, adding light effects (lens flares for instance), or just artistic effects, even motion graphics…
All this is still very much work-in-progress.

One of the most difficult part is to find how to get the smoother experience. Rendering dozens of frames, each of these composited from several high resolution images and complex mathematical effects, takes time; yet one does not want to freeze the GUI, and the animation preview needs to be as smooth as possible as well. These are topics I worked on and experimented a lot too because these are some of the most painful aspect of working with Blender where we constantly had to render pieces of animation to see the real thing (the preview is terribly slow and we never found the right settings even with a good graphics card, 32GB of memory, a good processor, and SSD hard drives).
One of the results of my work in GIMP core should be to make libgimp finally thread-safe (my patch is still holding for review, yet it works very well for us already as you can see if you check out our branch). So it should be a very good step for all plug-ins, not only for animation only.
This allowed me to work more easily with multi-threading in my plug-in and I am pretty happy of the result so far (though I still plan a lot more work).

Another big workfield is to have a GUI as easy to use, yet powerful, as possible. We have so many issues with other software where the powerful options are just so complicated to use that we end up using them badly. That’s obviously a very difficult part (which is why it is so bad in so many software; I was not saying that’s because they are badly done: the solution is just never as easy as one can think of at first) and hopefully we will get something not too bad in the end. Aryeom is constantly reminding me and complaining of the bugs and GUI or experience issues in my software, so I have no other choices than do my best. 😉


You’ll note also that we work on very short animations. We actually only draw a single cut at a time in a given XCF file.  From GIMP Motion, we will then export images and will work on cut/scene transitions and other forms of compositing in another software (usually Blender VSE, but we hear a lot more good of Kdenlive lately, so we may give it a shot again; actually these 2 introduction videos were made in Kdenlive as a test). Since 2 cuts are a totally different viewpoint (per definition), there is not much interest on drawing them in the same file anyway. The other reasons is that GIMP is not made to work with thousands of high-definition layers. Even though GEGL allows GIMP to work on images bigger than memory size in theory, this may not be the best idea in practice, in particular if you want fast renders (some people tried and were not too happy, so I tested for debugging sake: that’s definitely not day-to-day workable). As long as GIMP core is made to work on images, it could be argued that it is acceptable. Maybe if animations were to make it to core one day, we could start thinking about how to be smarter on memory usage.
On the other hand, cuts are usually just a few seconds long which makes a single cut data pretty reasonable in memory. Also note that working and drawing animation films one cut at a time is a pretty standard workflow and makes complete sense (this is of course a whole different deal with live-action or 3D animation; I am really discussing the pure drawn animation style here), so this is actually not that huge of a deal for the time being.

To conclude, maybe you are wondering a bit about the term “cel animation”. Someday I guess I should explain more what was cel animation, also often called simply “traditional animation” and how our workflow is inspired by it. For now, just check Wikipedia, and you’ll see already how animation cels really fit well the concept of “layers” in GIMP. 🙂

Have a fun viewing!

ZeMarmot team

Reminder: my Free Software coding can be supported in
USD on Patreon or in EUR on Tipeee. The more we get
funding, the faster we will be able to have animation
capabilities in GIMP, along with a lot of other nice
features I work on in the same time. :-)

Wilber week 2017: our report

Wilber Week 2017: the hacking place
ZeMarmot reached Bacelona airport!
ZeMarmot reached Barcelona airport!

Last week, the core GIMP team has been meeting for Wilber Week, a week-long meeting to work on GIMP 2.10 release and discuss the future of GIMP.  The meeting place was an Art Residency in the countryside, ~50km from Barcelona, Spain, with pretty much nothing but an internet access and a fire place for heating. Of course, both Aryeom and I were part of this hacking week. I personally think this has been a very exciting and productive time. Here is our personal report (it does not include the full result for everyone, only the part we have been a part of).

Software Hacking, by Jehan

GIMP on Flatpak

I’ve wanted to work on an official Flatpak build for at least 6 months, did some early tests already back in September, but could finally make the full time only this week. The build is feature-complete (this was not the case of the original nightly builds of GIMP, used as tests by Flatpak’s main developer, back when it was still called xdg-app; also these incomplete builds seem to have not been available anymore for a few months now), or nearly (since some features are still missing in Flatpak).

I’ll talk more on this later in a dedicated post, detailing what is there or not, and why, with feedback on the Flatpak project.
Bottom line: GIMP will have an official Flatpak, at least starting GIMP 2.10!

Heavy coding and arting going on at #WilberWeek
“Heavy coding and arting going on at #WilberWeek” (photo by Mitch, GIMP maintainer)

Working on the help system, Windows build, and more…

I’ve also worked in parallel on some other topics. For instance I’ve made a new Windows build of GIMP to test a few bugs (with my cross-build tool, crossroad, which I hadn’t used for a few months!), fixed a few bugs here and there, and also spent a good amount of time working on improving language detection for the help system (in particular some broken cases when you don’t have exactly the same interface language as the help you downloaded, since we don’t have documentations for as many languages as we have GUI translations). This part is mostly not merged in our code yet because unfinished. But it should be soon.
All in all, that was 26 commits in GIMP (and 1 minor commit in babl) last week, and a lot more things started.

Art hacking, by Aryeom

Aryeom, ZeMarmot director, contributed a lot of smiles (as always), art and design. Since Mitch forgot our usual “Wilber Flag”, she quickly scribbled one on a big sheet of paper (see in video).

Apart from playing with Wilber stamps, created by Antenne Springborn, Aryeom also spent many hours discussing t-shirt and patch designs with Simon Budig. Here is one of her nice attempts for a very classy outlined-Wilber design:

Outlined-Wilber design by Aryeom

Funny story: she chose as a base a font called montserrat, without realizing that the region we were in at the time was called Montserrat as well. Total coincidence!

She has also been working on some missing icons in GIMP, for instance the Import/Export preferences icon.

And with time permitting, she scribbled various drawings on paper, because digital painting doesn’t mean you should forget analog techniques, right?

Social hacking: interviews and merchandise

Developer interviews

I have been wanting to bring a little more life to our communication ever since we got a new website for GIMP. We already produce more regular news. I wish we had even more. I also think we should even extend to community news. So if you’ve got cool events around the world involving GIMP, do not hesitate to tell us about them. We may be able to make it a gimp.org news when time permits.

Something else I wanted is showing the people behind GIMP: developers and contributors, but even the artists, designers and other creators making usage of GIMP as a tool in their daily creative process. I have talked about these interviews for a few months now, and Wilber Week was my first attempt to make them a reality. I interviewed Mitch, GIMP maintainer, Pippin, GEGL maintainer, Schumaml, GIMP administrator, Simon, a very early GIMP developer and Rishi, GNOME Photos maintainer and GEGL contributor.
All these interviews soon to be featured on gimp.org!

And that’s only a start! I am planning on interviewing even more contributors (developers and non-developers) and also artists. 🙂

Merchandising

We regularly have requests about t-shirts or other merchandising featuring Wilber/GIMP. So we sat down and discussed on what should be exactly GIMP’s official position on this topic. As you know, I, personally, am all for Libre Art, so this was my stance. And I am happy that we are currently willing to be quite liberal.

Yet we have a lot of values and that was our main concern: how nice is your design? Is your merchandising using good material? Is it produced with ecologically-conscious techniques? Do you give back to the community?… So many questions and this is why Simon Budig will work on a ruleset of what will be acceptable GIMP merchandising that we will “endorse”. Endorsement from the GIMP project will mean that we will feature your selling page link on gimp.org and also that you will be allowed to feature on your own page some “endorsed by GIMP” text or logo. I’ve been quite inspired by this system which Nina Paley uses for Sita Sings the Blues movie.

Well that’s the current status, but don’t take it as an official position and wait for an official news or page on gimp.org (as a general rule, nothing I write is in any way an official GIMP statement unless confirmed on the main website by text validated by peers).

Release hacking!

The one you’ve all been waiting for, so I kept it for the end, or close: what about GIMP 2.10 release? We finally decided that it is time to get 2.10 going. We still have a few things that we absolutely need to fix before the release, but the main decision is that we should stop being blocked by unfinished cool features.

We have got many very awesome features which are “nearly there”, but mostly untouched for years. Usually it means that it globally works but is either extremely slow (like the Seamless Clone or n-point deformation tools), or that it is much too instable (up to the crash), often also with unfinished GUI…
Well we will have to do a pass through our feature list and will simply disable whatever is deemed non-releasable. The code will still be here for anyone to fix, but we just can’t release half-finished unstable features. Sorry.
The good news is that it suddenly divides our blocker list by 10 or so! And that should make GIMP 2.10 coming along pretty soon.

But so what of all these cool features? Will we have to wait until GIMP 3 now? Not necessarily! We decided to relax the release rules, which come from a time where all free software released major versions with new features and minor versions with bug fixes only (some kind of semantic versioning applied to end software). So now, if any cool new feature comes along or if the currently deactivated features get finished, we are willing to make minor releases with them! Yes you read it well. This makes it much more exciting for developers since it means you won’t have to wait for years to see your changes in GIMP. But it also means that our contribution process gets much more robust to the unfinished-patch-dropping issue. Of course the libgimp API (used by plugins) still stays stable. Changes does not mean breaking stability!
This was also summed-up in an official gimp.org news recently.

I am so happy about this because I have been pushing for this change in our release process for years. Actually the first time I proposed this was in Libre Graphics Meeting 2014, Leipzig (as I explained in my report back then). I call it a rolling release, where we can release very regularly new stuff, even if just a little. This time though, the topic was brought up by Mitch himself.

People hacking

The conclusion of this week is that it was very nice. As Simon Budig put it in his interview: I mostly stay for the people. I think this is the same for us, and these kind of social events are the proof of it. The GIMP project is ­ — before all — made of people, and not just any people, even nice people! Such event is a good occasion for meeting physically, from time to time, and not just with pixels and bits exchanged through the internet.
We also spent a few hours visiting Barcelona, in particular Sagrada Familia, and doing a few hikes in Montserrat.

This slideshow requires JavaScript.

Awesome panorama shot showing several members of GIMP and GEGL (photo by Aryeom)
Panorama shot featuring several members of GIMP and GEGL (photo by Aryeom)

Financial hacking: ZeMarmot

As a conclusion, we remind you that ZeMarmot would be the way for me to work full-time on GIMP software development! We could do nearly as much every week if our project had the funding which allowed us to sustain ourselves while hacking Free Software. So if you wish to see GIMP be released faster with many cool features, don’t hesitate to click our Patreon links (for USD funding) or the Tipeee one (EUR funding).

See you soon!